00:00:00.160
My name is Chris, and I'm going to talk about text editors and Tmux, which is a terminal multiplexer. Before I dive into that, let me introduce myself. I will frequently refer back to my keyboard, as my remote is not working.
00:00:11.759
I have recently moved; in the last three years, I have lived in three different cities: Seattle, San Francisco, and just last month, I relocated to the Financial District of Portland, Oregon. This is a picture of my fiancée and our dog, Baxter. I now work for a distributed team, which means I collaborate with many people who are nowhere near me. I have two developers I work with in San Diego and a couple of others in Portland. It's a mix of good and bad; on one hand, I can go days without leaving the house, which might not be the best thing for someone, but on the other hand, I get to work with a variety of people.
00:00:30.480
In addition to writing code, I'm also really passionate about photography. So, if you ever get tired of talking about coding, feel free to discuss photography or anything else with me. Now, let’s start talking about Tmux and Vim. Before we dive in, I want to highlight some of the tools you might already be using today if you aren't using Vim and Tmux.
00:01:06.600
The first tool is RubyMine. How many of you use RubyMine regularly? (Approximately three people raised their hands.) That’s cool! I’ve actually worked in teams that have relied solely on RubyMine. RubyMine is relatively new; it was released in 2009 and costs about $99 for a license.
00:01:21.000
This is what RubyMine looks like. Honestly, using this all day gives me a headache due to the overwhelming interface. On the left-hand side, we see a file tree, while the right contains tabs and widgets. We have a Rails server console open as well. The issue I dislike most is the small coding area, which isn’t ideal for working.
00:01:55.840
Who here uses Sublime Text? (It appears that many more hands go up.) Sublime Text has been around longer than RubyMine, but I’ve noticed that it only gained popularity after the release of Sublime Text 2 in 2012. Sublime Text is $70, which makes it cheaper than RubyMine, and it offers a simpler yet powerful interface. Here’s how Sublime Text looks; we still have our terminals open, but we now have a larger typing area.
00:03:40.000
We can also implement a dark color scheme, which is a nice feature. However, I find the top Mac OS menu bar distracting. Sublime Text allows us to run tests within its interface, providing some of the IDE functionalities that RubyMine offers. But personally, it's still not ideal for me; I find the interface quite distracting.
00:04:41.920
Now we move on to the magical Vim and Tmux. How many of you are already using Vim and Tmux? (A good number of hands go up.) Alright! Since most of you are using it, I hope you find some value in what I'm about to discuss. However, I also hope to learn from you if there's something I’m doing wrong or a more efficient way that I could be doing things.
00:05:05.840
As I mentioned, Vim is a text editor, while Tmux is a terminal multiplexer, which essentially means it is like a windowing system for your terminals. You can manage different applications, move them around in panes and windows, and keep everything organized in one place. Vim runs directly in the terminal, which means it can also be managed by Tmux.
00:05:59.680
Let’s take a look at Vim within Tmux. This is a full-screen screenshot, void of the Mac OS menu bar, allowing for full focus on the task at hand. At the bottom of the screen is my status bar. Just like with other editors, I can quickly open files, run tests, type into a console, and maintain my Rails server without it being in my face all the time. This environment is how I prefer to work.
00:06:41.680
Moving on, let’s delve into Tmux. The first step is getting it installed. I already have it set up, so I may get an error, but you probably don't have it installed yet, which is fine. The next step is to create a new session; Tmux operates on a server concept. You can create sessions, and your terminal acts as a client to those sessions.
00:07:12.960
Even if you close your terminal, your session will remain intact. This is particularly beneficial if you are connected to a development box or server and wish to resume your work later without losing anything. Let's create a new session called ‘ancient city,’ which will bring us into the Tmux workspace.
00:09:20.240
This is what Tmux looks like. The interface is essentially the same as the previous terminal, but now we have a status bar at the bottom. The left side of my status bar displays the session name, while the list of all my session windows is shown. To the right, we indicate the host machine I'm connected to, along with the date and time.
00:09:51.760
The status bar is highly customizable; anything that generates output can be placed in there. I’ve seen integrations like CI workflows so that you get a visible indicator of your build status or even weather updates, sports scores, or email notifications.
00:10:21.320
If you’re unsure how to get started with Tmux, here is a link to my Tmux configuration. I’ll show it again later, so there’s no need to write it down. This configuration includes that customizable status bar and provides a helpful starting point. There's plenty of commentary in the file to assist you as well.
00:10:56.680
From this configuration, you’ll also find my keyboard shortcuts. For this reason, I won’t type out the keyboard shortcuts here, since you can customize them as you wish.
00:11:51.680
Now that we have a grasp of what Tmux is, let’s explore how to use it for organizing your workspace. We will enter our Tmux session and start doing some coding. If you’re like me, you may work on multiple projects that sometimes take a lot of time.
00:12:34.920
Thus, it is handy to run processes in the background. To do that, we create a new window in Tmux and name it ‘Ruby.’ Just to clarify, when we start an IRB session—the window name will change to reflect that. Tmux identifies the process name and uses it to label your window automatically.
00:13:59.360
We’ll create another window, this one named ‘Games,’ just in case we need to take a break and play a game while waiting for IRB to finish its process. Yesterday I installed an awesome game library called Emacs and started a text adventure game.
00:14:54.960
Tmux also allows us to create multiple panes within one window; this way, we can have a second pane to run a different game. So, I'll fire up Emacs again for a game of Tetris.
00:15:35.920
While all this is running, we can transition back to the IRB window and begin coding a simple method, such as adding up the first 100 million numbers. As this computation takes while to process, we can keep playing Tetris in the background.
00:16:17.760
When the calculation is done, notice the flash at the bottom of the screen. When there are updates in any other window, the Tmux status bar will flash, and the background color of the window with new data changes to alert you. Now if we go back to the IRB window, we can see that the result of our calculation has been produced.
00:17:33.200
This is a useful feature of Tmux - it helps in organizing multiple tasks we are working on without being overwhelmed while simultaneously notifying us when there’s a crucial update to check.
00:18:23.440
Moreover, if you are connected to another machine via SSH and lose connection, or if you’re tailing logs and looking for errors, Tmux lets you run background tasks and informs you when something pops up that you need to check.
00:19:02.120
Now, let’s talk about scripting within Tmux, which is one of its powerful features that is not frequently utilized. Everything you can achieve within Tmux, we can accomplish via scripts.
00:20:01.200
We currently find ourselves in a Rails app. To start a Rails server in a new window, we can use the Tmux command to do just that. This command will create a new window and initiate the Rails server. It streamlines our workflow well.
00:20:52.080
We can easily create another window for our console as well. Ideally, I would stick to keyboard shortcuts for efficiency, but knowing you have the option to script out your Tmux session is great for automating setups in the future.
00:22:09.200
Here is a sample script showing how to create a new session with three windows: one for the server, one for the console, and another for Vim. Finally, we can attach ourselves to that session. Let’s run the script now. First, ensure that we detach from our current Tmux session.
00:23:52.000
Once we run the script, notice how the setup is intuitive. The Tmux session is now ready with four Windows: one terminal window, the Rails server running, the Rails console operating, and Vim ready for your coding.
00:25:08.480
This approach is incredibly helpful if you’re dealing with extensive test suites or services. You can efficiently boot everything you need with minimal fuss—and even SSH into multiple machines if required.
00:26:21.760
Those are most of the Tmux features I use on a daily basis. If you want to learn more about Tmux, I recommend the book by Brian Hogan published on Pragmatic Bookshelf.
00:27:39.680
Now that we’ve covered Tmux, let’s move on to learning Vim, where we'll review tasks that you're probably familiar with in other editors and introduce some functions that may not be available elsewhere.
00:28:47.680
As many of you have likely used Vim, I’ll provide a brief introduction for those who may be unfamiliar to ensure no one feels lost as we progress. To start Vim in our Tmux session, you can use the vi command; it may require Vim depending on your installation.
00:29:40.640
When entering Vim, there are three basic actions: opening a file, adding or changing text within the file, and saving those changes. Vim operates on multiple modes; by default, you're in 'Normal Mode.' This can be confusing for newcomers as they won't be able to type directly.
00:30:47.440
Other essential modes include Visual Mode for selecting text, Command-Line Mode for inputting commands, and Insert Mode for typing text. Let's go through those three crucial actions quickly.
00:31:35.680
To open a file, enter Command-Line Mode using the colon key. You would type 'edit math.rb' to begin editing the math.rb file. Now, switch to Insert Mode by pressing ‘I.’ Notice how my status bar changes to bright green to indicate I am now in Insert Mode.
00:32:59.680
Once finished typing, you exit Insert Mode by hitting the Escape key. To write your changes, go back down to Command-Line Mode and type 'W' (colon W) to save the file. Those are the Vim basics, which many of you may already know.
00:34:44.960
Moving along, I'd like to discuss how to utilize testing effectively within Vim. After ensuring our setup, we need to create directories for our code and tests. We can create these directories using the system command within Vim.
00:35:47.680
Next, we will write a spec file for testing. From the command line, we will edit a new spec file called math_spec.rb and begin coding a RSpec test to describe the functioning of our add method.
00:36:56.440
Let's assert that adding two numbers works correctly. We expect two plus four to equal six.
00:37:34.840
Executing the test can be less straightforward in Vim compared to other editors that typically have a button or a keyboard shortcut. However, in Vim, we can establish a simple command to execute the last RSpec command if we're not currently in a spec file, which makes it easy to switch and run our latest test.
00:38:38.440
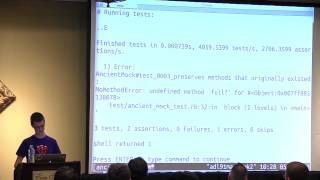
Now, let’s rerun our test. We should expect failures because the mathematical library we're utilizing doesn’t exist yet, so we need to create that math library.
00:39:47.440
After running the tests again, we’ll receive another failure alert indicating that we lack the method we are trying to validate. Next, we can implement the add method.
00:40:45.680
Now, when we rerun the test, we might see a green light indicating success. If we need to add additional tests, we can do so simply by going back to the previous test file utilizing the shortcut control O to navigate back to the spec files easily.
00:41:51.920
Upon writing our additional tests to include negative numbers, we would inevitably face another failure as expected. Once again, we can navigate back to the implementation to resolve these issues, using control I to switch directions.
00:42:39.680
We can work on our implementation code until the tests pass. You'll see that Vim keeps track of every position your cursor has been, simplifying navigation through your files.
00:43:36.680
Testing in Vim has proven straightforward. I personally prefer this focused approach where I can view my test results, coding implementation, and console outputs cleanly, giving me a neat overview of what's happening.
00:44:25.680
Searching for code within our files is a routine task. Let me demonstrate how search and replace functions work in Vim.
00:45:10.480
Our current code seems to have awful variable names, specifically single letters that don't offer clarity. We'll aim to change these by performing search-and-replace operations.
00:46:15.440
To initiate searching in Vim, we can use the slash key and type in our target variable. This allows us to find instances, however, we want to refine our search to specifically target our variable names.
00:46:57.200
To limit our search only to the variable names, we'll utilize regex for searching specific words, providing a more efficient output.
00:47:44.680
Next step involves replacements; the command line allows us to facilitate this by replacing incorrect instances with accurate representations together with prompts before applying changes.
00:48:30.320
We can also replace R with 'right' with similar steps, leading to efficient updates within the code all from within Vim's command structure.
00:49:57.680
Macroeconomics are a unique feature within Vim that I'm particularly excited to share, as most editors do not support this capability. Recording a macro allows you to define and automate repetitive tasks.
00:51:22.000
In the example, we will sort a list by using our strong shortcuts on any selected line, making this tidily organized and efficient on the go.
00:52:27.040
When we save the macro, Vim will store our recorded sequence so we can replay it Char by Char using the at-sign followed by your saved macro, allowing speedy execution on workload processing.
00:53:33.760
The Argument List presents another exciting aspect of Vim. Essentially, it presents a list of arguments that can be applied through multiple files effectively.
00:54:34.200
This aspect becomes invaluable for projects, as modifying more than one file simultaneously can be efficiently navigated through the Argument List.
00:55:41.640
Incorporating plugins is also instrumental for advanced functionalities, especially helpful in complex Rails projects where multitasking between files is required.
00:56:25.920
Control P is one plugin used for quickly opening files in large projects by fuzzy searching the project directory.
00:57:42.000
Another beneficial plugin is the Silver Searcher, which allows for efficient searching throughout project files for defined constants.
00:58:35.680
Lastly, g.v is a useful tool for creating Gists straight from Vim in just a few keystrokes without heading over to GitHub.
00:59:58.720
To further your learning of Vim, I recommend Drew Neil's book and his screencast series, which are helpful resources. Drew also offers workshops where participants can learn in small groups.
01:01:05.600
As we wrap up, I’d like to talk about remote pairing, which I leverage regularly since I work with others not physically present.
01:02:20.000
Utilizing Vim and Tmux for remote pairing is significantly superior to screen-sharing apps. You retain your color scheme, fonts, and terminal settings, facilitating a much smoother workflow.
01:03:29.000
You can create a new Tmux session for collaborative work, ensuring that others can connect, and promptly modify the permissions accordingly.
01:04:40.960
The working environment remains consistent between sessions, ensuring comfortable collaboration across various setups.
01:05:27.920
Whether collaborating on a desktop or laptop, the productivity remains seamless during coding sessions.
01:06:09.680
To summarize, it seems many of you are already familiar with Tmux and Vim. I hope that there's at least one new technique you’ve learned today.