00:00:10
My name is Reg Rezac, and that is how you pronounce it. Or if you're in Poland, it's 'Jessic' or 'Just Ger.' I'm the co-founder and CEO of Bendy Works. You can find me on Twitter as 'List Rafi.' I do have a page that I worked on that's currently in space, growing food that astronauts can eat. So basically, it's the next step towards generation ships, which is pretty cool.
00:00:36
But I'm here today to talk about video games in outer space, specifically Kerbal Space Program. I'm good friends with a woman named Ash Dryden; give it up for Ash! This is actually a quote from her: whenever Brad is drinking, you want to make sure you're sitting next to him, because instead of being obnoxious, he teaches you orbital mechanics. This is true! You also don't need to say the first part; you can just sit next to me, and I'll teach you orbital mechanics, whether I've had alcohol or not. I love teaching people about this kind of stuff.
00:01:17
Also, related to Ash, get your altar comets. There's only two left: one is in Portland in like a week, and then San Francisco after that. It's a really cool thing. All right, so prerequisites for putting on a talk like this: first of all, you have to buy Kerbal Space Program. It runs for about 40 bucks on Steam, but as of today, thanks to Ben for informing me of this, it's actually on sale through November first, so $24 gets you Kerbal Space Program.
00:01:42
You need to install sea-can, which is basically SCAN but for Kerbal—the Comprehensive Kerbal Archive Network. Using sea-can, you can install a thing called KRPC. You might also want to learn a few things about astrodynamics. So I advise if you want to go to UW-Madison, you should take EMA, which stands for Engineering Mechanics and Astronautics 550, focused on astrodynamics. You might also want to take the Mechanical Engineering 446 Automatic Controls. This was the second lowest achieving class that I took in college, mostly because it was an online course—apparently that doesn't work so well for me.
00:02:26
Install Ruby correctly, which is probably the hardest thing to do on this slide, and then you want to gem install KRPC. The third bullet point is a generic add-on mod for Kerbal Space Program, and there are a bunch of libraries that you can use to connect to Kerbal, and this is just the Ruby version of that. You have to write some Ruby, and you're good to go. So, for all of you who would like to get on the local network for—what is it, Alamo Wi-Fi?—and go to this URL.
00:02:49
I couldn't be bothered to port forward 80 to 3000. Also, this server is running in development mode, so let's hope that it continues to work. But that should take you to this computer right here that is running a Rails server. So the first bit that we're going to do today we'll call Project Mercury, and we're going to hover a spacecraft—not quite to outer space, but just kind of hover.
00:03:32
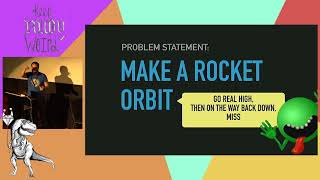
Yeah, just hover. All right, so that's a problem statement: a rocket hover. What does that mean? What are some of the keywords in here? Well, the first is hover, and what we mean by that is we want to keep altitude constant and sufficiently airborne, so that we're not just standing there; we're actually above the ground. The other key word here is rocket. So in our situation, we're going to have exactly one input, which is the throttle. It's also going to have a variable mass, which is kind of tricky to deal with because as the throttle goes above zero, you are expelling some of your mass out the business end of the rocket.
00:04:22
So the whole thing is going to get lighter as time progresses forward. Let's do some statics here. We have this force equals MA, and you get all this stuff, and you end up with this last part, which is actually a nonlinear second-order differential equation. That's pretty unappealing; you do not want to deal with this. What are we going to do about this? This is a hard thing to manage, and it only takes into account two forces: gravity and thrust. What about any sort of perturbations? Or what if we don't know the exact amount of thrust that we're sending out the bottom of this rocket? Like, is it 3,000 kilonewtons or is it 3,001 kilonewtons? You don't know.
00:04:56
So it's really challenging to accomplish anything by relying solely on this mathematical approach. So what are we going to do instead? We're going to use what's called a PID controller. PID stands for Proportional-Integral-Derivative Controller, which again seems very mathy and unattractive. I don't want to touch that; it looks difficult. The great thing about a PID controller is that you're not actually going to be doing any integration or derivatives—like, that's the really, really good news! The hardest mathematical operation you're going to use in a PID controller is division. It's pretty reasonable.
00:05:56
This is the feedback diagram of how this is going to work: we're going to set a throttle, and that throttle controls a rocket, which translates the throttle amount into an actual altitude. That actual altitude is going to change over time, and we're going to set that to detect how high we are. What our actual altitude is going to go into our PID controller, and we're also going to tell it what our desired altitude is. It will then perform simple mathematics—only up to division—and output a new throttle that we want to send back into the rocket.
00:06:24
This is called a negative feedback controller. We like to talk about positive feedback systems in programming or in the management of people; however, generally, you want a negative feedback system to converge to the actual desired altitude. Our PID controller in Ruby will perform some setup, check the current time, run a loop, sleep for a little bit, calculate three things: the error, which is the difference between where we are now and where we want to be, the accumulated error, and the derivative.
00:06:58
We keep track of the current error, multiply it by the difference in time that we slept, and then we take a derivative, which is basically, again, where the division comes in. We come up with another number. We have the PID constants, which we can determine through trial and error or some interesting math using Laplace transforms. Eventually, you just set the throttle, and you can save some state for later. With that, you can actually get a rocket to hover, assuming you have some control to make sure it doesn't tip over, of course.
00:07:40
Would you like to see what that looks like? All right, so this is Kerbal Space Program.
00:07:54
To start the game, we're going to resume and see over here. You can see the KRPC server; this is part of the add-on that I have installed. We're going to start that server, and we're going to the Vehicle Assembly Building to load a rocket that I've already created called the small AAA one—small hover. We have to have a call sign for that, which makes it easy to find. It's this little guy; it's quite cute.
00:08:25
So we're going to launch it with one poor soul inside; her name is Valentina Kerman. We're at 78 meters above sea level at this point. I'm going to pull this over to the side and bring up the localhost version of Space I Fail. It is the same server, but because browsers don't like 127.0.0.1, I don't know how that works, but it does for me. You should all be on spacefail:3000. It just says it's not active because we haven't started anything yet.
00:08:49
Let's go to the terminal; we have one file in this folder aptly named 'go'. I guess it's the opposite of no-go. We're going to run that command, and that's going to give us a countdown: three, two, one, giving me enough time to show the appropriate windows. Here we go. So, three, two, one—there we go! Taking off! This probably should have been refreshed.
00:09:17
Live demos, everyone! Well, if you have it in front of you, you should be seeing some graphs. Great! This is running in development mode, so maybe the asynchronous aspect isn't quite working. But if you look at the graphs, you'll see one of them represents altitude, and it looks pretty. And the other graph shows the PID variables that change over time, as well as the throttle and the fuel. Right here, we have the throttle, and up here is the height.
00:09:37
I had set the desired altitude to 250 meters, and it basically feathered up. Well, now that all the data is gone, it's kind of boring to watch. But that's what it looks like. As it goes, you can see the throttle is going down because the craft is getting lighter. I didn't program this; all I wrote was a couple of lines to determine the accumulated error and the derivative. It's just working for me.
00:10:03
This is an example of stepping back from what seems like a really challenging mathematical problem and realizing someone else solved this in a much easier way. One fun way to see how this works with the decreasing mass is if we cancel this, the rocket will eventually start to move upward. Up here, we can see 253, 254; it's going up because it's maintaining the same throttle, but it's getting lighter, so it just keeps rising until it runs out of fuel.
00:10:37
All right, so that's hovering.
00:10:46
Cool! Next up is orbit: Project Gemini. We have a new problem statement; we're going to make our rocket achieve orbit. We already know what a rocket is, but what does orbit mean? What should we define that as? Let's say we go really high and then come back down. Thanks to Douglas Adams for the inspiration there. That's basically what's happening: you go really high and ensure that you're going fast enough to miss the Earth on the way back down.
00:11:04
To better visualize that, we have our rocket. First of all, it's going to be a multi-stage rocket. We have our first stage which consists of two little boosters. The second stage is the bottom half, and then we have a third stage. The reason you have these different stages is that having one big rocket with one stage means all the extra weight of the empty portion of the fuel tank holds you back, bogging you down.
00:11:29
You want to release mass so that your rocket can get lighter, allowing for more acceleration. So that's our rocket. Let's discuss what orbit actually means. Here, we have a space station. Lets draw a straight line. We're not going to follow the curvature of the Earth, which is hard to visualize because it's so big. Let's draw a horizontal line that goes off into space. Now let’s pretend this spaceship is going to zoom really fast in that direction.
00:11:52
At the same time, gravity is acting on it, pulling it towards the center of the Earth in a slightly slanted direction. It falls towards the Earth. Even though we displayed the curvature here, these two events are happening simultaneously, creating this curved path. In relative terms that we can understand, let's say that's one foot above ground, and we’re going from Austin to Houston.
00:12:16
If you've seen my drawing of Minute Maid Park, the curved distance from Austin to Houston—assuming a bird flies—is 237 kilometers. If you go in a straight line from Austin one foot above the ground to Houston, you would end up 4.41 kilometers above Houston.
00:12:39
That's the difference in curvature of the Earth compared to a perfectly flat line running from Austin to Houston. If we think about how long it would take for something to drop that 4.41 kilometers, the answer is about 30 seconds. Therefore, we conclude that if we have to travel from Austin to Houston in 30 seconds, we need to go 7.9 kilometers per second. That is exceedingly fast, and that's what you need to achieve orbit at one foot above ground at 200 kilometers.
00:12:57
It's a measly 7.8 kilometers per second, but the further you get from the Earth's surface, the slower you have to go to remain in orbit. If I were to run straight towards Houston, I'd have to be going 7.9 kilometers per second so that the gravity pulling me downward is about as fast as the Earth is falling away from me.
00:13:26
What are the energy requirements to achieve that? To get up into space, say at 200 kilometers, you perform some potential energy calculations and you find it costs about two megajoules per kilogram to ascend to 200 kilometers. However, to reach the necessary sideways velocity, it requires 30 megajoules per kilogram. The energy required just to ascend is peanuts compared to the effort needed to achieve orbit.
00:13:50
This is about a 15-fold difference. So how are we going to accomplish that? We're going to have a checklist, just like NASA does. We're going to use state machines, one of which controls the different stages, dropping off engines that might explode due to collisions on the way down, and that will be an exciting moment. We'll also have a second state machine for steering and throttle control.
00:14:20
Every tick at intervals of 0.1 or 0.2 seconds, we will evaluate our actions based on the two different states. We'll encase them and determine the required actions for each state transition. For example, when we transition from stage 1 to stage 2, we'll instruct Kerbal Space Program to activate the next stage, which will drop off the engines.
00:14:45
The principle of establishing an effective system is essential; the fewer if statements to determine conditions within the state, the better. We want to focus primarily on our state machines and pitch our rocket over so we’re moving sideways by the time we reach space, all while managing the rocket's staging.
00:15:04
Let's see how to do that! We are going to revert to vehicle assembly mode and load this rocket. You might imagine this one isn't going to cut it for reaching space, so we'll use the AAA to Kerbo-1 for launching. This looks a little more suitable for the task, and you already saw in the slides how it appears.
00:15:24
All right, Valentina's back in there and ready for an orbital ascent. Here, you can see we’ve got a couple of Ruby files that are integrated: a checklist file, mission control, and a state factory that retrieves all the data from Kerbal Space Program. This time we're going to skip the countdown; one of the exciting features of this mod is that you can manipulate the UI within Kerbal.
00:15:49
Great! So, okay, it seems there should be a button that allows us to proceed, but it's not showing up. We may have to skip this demo. Do I need to restart the server? Well, probably not, but we can certainly try reloading.
00:16:09
It looks like it's not functioning correctly and might require a fresh start. In all my previous tests, situations like this have never occurred, which is quite exciting.
00:16:40
Once again, it seems to be one of those scenarios with incorrect IP addresses. All right, we're going to have to skip that demo; my apologies, everyone. I assure you, it works perfectly.
00:17:00
As we take a live demo of this conference, I encourage you all to get the game because it is an unforgettable experience. The first time you get into space and see it from the cockpit, you think, "Wow, I'm in space!" Then you can head for the moon. Yes, it's spelled that way in the game.
00:17:25
So Project Apollo: we're going to land a rocket on the moon. As programmers, we might interpret some implications from this problem statement. For example, the landing speed isn’t specified, so we’re just going to wing it and see what the code reveals.
00:17:45
Let's talk about orbital transfers and introduce you to the Hohmann transfer orbit. We have a spaceship in a circular orbit around a body, and we'll execute a maneuver that extends the orbit on the other side, resulting in an elliptical orbit. However, if we want to achieve a circular orbit again, we need to fire the rockets to increase the orbit size.
00:18:11
This is how we attain a larger orbit using regular chemical rockets. However, transitioning to ion drives involves a different process altogether. If you've seen the Martian, the movie shows incorrect details regarding navigation in space. The book, however, gets it right, stating that you would use ion engines.
00:18:40
So, how will we reach the moon? We want to not only achieve a larger orbit but also ensure we meet the moon’s position. Therefore, we will move towards a larger orbit and fire the engine at just the right time to meet the moon at an unspecified speed.
00:19:01
We must identify how significant the burn needs to be, which involves calculating the insertion burn's delta-v—lots of jargon, I apologize. Further, we have to determine the correct position for executing the burn. If we arrive at the moon's orbit and it isn't there, that's a problem.
00:19:31
Next, we prepare for the burn. We will fire near the midpoint in the game so that we don't have to wait until the end of the conference for this demonstration. During the burn, instead of reaching full throttle, we will dial it down to around 10% for precision.
00:19:49
Afterwards, we’ll move into our trans lunar orbit, followed by an outer moon orbit, a mid-range approach, and finally the last approach, because, of course, final approach is the last state.
00:20:09
All right! Let's hope this works! We should load the save to the moon. We’re starting from orbit to skip the entry phase. Here we are in orbit; this is like the last stage of a multi-stage rocket.
00:20:25
Let's zoom out here—there's Kerbin, not Earth, and that's where we're headed. We are about to perform our orbital change maneuver, so I hope this time it works smoothly.
00:20:46
We’re currently adding a planning node and pushing it outward. We’ll provide a bit more thrust to ensure we achieve our orbit fast enough. If we leave it as is, we’ll end up where the moon currently is, not where it'll be. So we must adjust our approach accordingly.
00:21:04
Now, we’re preparing to enter the moon's sphere of influence. There we go! We’ve established an orbit that will take us to the moon. Let's refresh the dashboard, and hopefully some of you can see that too.
00:21:21
We’re about to execute our insertion burn. We’re lined up; there it goes. You can see the throttle spike upwards, and it's slowly adjusting as required. This dashboard code is all written in Elm.
00:21:55
If you're interested in discussing Elm later, I'd be happy to share more about it; I wrote the Action Cable Elm package myself. Here we go with the insertion burn, monitoring how much delta-v we have left for this maneuver.
00:22:10
As we approach the 30 or 20 threshold, we'll finalize our insertion burn. I’ll cut the throttle down to zero—called it good enough. This would typically take quite a while in the game.
00:22:29
One challenge with Kerbal is that it only simulates two-body physics rather than multi-body physics. You can’t simulate Lagrange points, which can be limiting.
00:22:48
Now we are rapidly approaching the surface, finally, and I hope you enjoy the landing! There are three crew members on this mission: Jebediah, Bill, and Bob.
00:23:10
And that's it! Thank you, Turbo-nuts, and more importantly, my Ruby program crashes once it loses communication with the vessel.
00:23:25
If you'd like to see a demo of the middle project in person, I'd be more than happy to show it to you—not on stage—but thanks again, and hope you enjoy the rest of the conference.