00:00:16.070
In order for this video to make sense, you're going to need to know a little bit about the Ruby language. If you don't know anything yet, pause this video, go to tryruby.org, go through that tutorial, and then come back to start the video. So in this first episode, we're going to be diving into CRUD; we're going to be talking about CRUD. Now bear with me if you're an expert in some of these languages and concepts; we'll get to the advanced stuff soon enough, but we need to make sure everyone's on the same page.
00:00:33.920
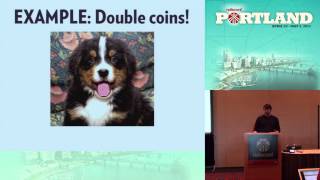
We're going to be creating Twitter for Zombies— that's our application. If you don't know why, go back to the front page and watch the intro, but let's jump into it for now. Here we have our first database table. It looks kind of like a spreadsheet— we're calling it 'tweets.' It has four rows and three columns.
00:00:51.860
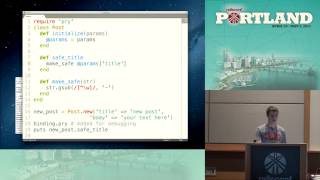
Now we might put a label on each of these columns. The first one is the ID, the second one is status, and the third one represents the zombies, like Ash, Bob, and Jim. These are our zombies. Our first zombie challenge is going to be to retrieve a hash of the tweet with ID equal to three. I'm not going to show you the solution just yet; first, I want to show you the result we want to get back from the database.
00:01:10.840
In this case, we want to get back a hash that looks like this. You should be familiar with what a hash is, but here's a small recap. If we do puts B status, we're going to get back 'I just ate some delicious brains.' If we do puts B zombie, we're going to get back Jim. And if we do this at the bottom, we'll see 'Jim said I ate some delicious brains' because you know zombies love eating brains.
00:01:35.720
Now let's get back to our database table and our challenge. So there's our challenge again. Now I'm going to show you the actual solution— the code that we want to write. We want to write T equals tweet dot find three. What that's going to do is get us back that hash. We can then do put CID to get us three, puts T status to get 'I just ate some delicious brains,' and puts T zombie gets us back Jim.
00:01:55.730
Now there's another way we can write this in Rails. Instead of puts T ID, we can do put T dot ID, puts T dot status, and so on and so forth. We can use these to find our solution instead of using the hash keys. Here's what our answer might look like with those pieces of code.
00:02:11.060
There's one Rails convention here that I want you to notice. Notice we have a capital 'T' in 'tweets' in the code solution, and what's happening on the back end is that it's going to lowercase that, pluralize it, and then look for a table called 'tweets' in our database.
00:02:33.990
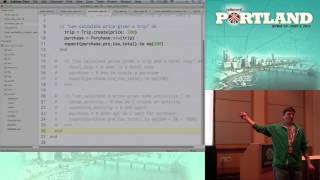
It's time to jump into the CRUD— by CRUD I mean create, read, update, and delete. Now let’s figure out how we can do each of these inside our Rails application. First, in create, we do tweet.new, set the status, and call T.save to save the item. For reading, we then do tweet dot find three just like you saw a moment ago. For updating, we're going to find the tweet, set values on it, and save it. Then for delete, we can find the tweet and call T dot destroy to delete it from the database.
00:02:53.880
Now we're going to go through each of these in a little bit more detail, and I'm going to show you some alternate syntaxes. But first, with create, notice that we're not setting the ID on the object here. That's because Rails is going to take care of that for us and properly increment the ID and store that in the database.
00:03:04.370
Another way we can create a new tweet is simply by sending in a hash of the items that we want to set. We can then save that. We can also write this all in one line by calling tweet.create, which will set these attributes and save the object.
00:03:20.620
Next up for reading, there are lots of ways we can read data out of the database. We can find a particular item with an ID number, find a bunch of items which will return an array, find the first one, find the last one, or find all of them. We can count them, and the interesting thing about count here is that it does it the correct way. It's not going to the database, pulling everything out, and then counting it; it actually does a count query on the database and returns that number.
00:03:43.510
We can also get all the zombies and order them by zombie name, limit the number to ten, get all zombies where the zombie name equals Ash, or we can put all these different methods together to do something we like to call method chaining.
00:04:01.890
Next up we have update. Remember with update we find the tweet, set something, and then save it. Alternatively, we can set the attributes values and send it in a hash and then save it. We can also call T dot update attributes, which will not only set the items but also save it. Next up is destroy, because zombies like destroying things, especially brains. So as you saw before, we can find an item and destroy it. We can also write this on a single line, and lastly, if you want to destroy all the tweets, we can just call tweet dot destroy all.
00:04:40.510
So we've already reached Zombie Lab 1. This is where you get to start coding and implement some of the stuff we've already learned. So go and have fun with your new zombie friends.
00:05:14.620
Welcome to Rails for Zombies - level 1. In this episode, we're going to go over some of the things we left out in the first set of Rails for Zombies videos covering topics like creating a Rails app, the command line, database migrations, the Ruby 1.9 of Bundler, and database configuration.
00:05:19.400
If you haven't yet, I highly recommend you get Rails installed on your laptop or computer so that you can run some commands and follow along as we teach them. I’m not going to go into the nitty-gritty details of installing Rails on every platform; I'm just going to mention that if you're on Windows and don’t have it installed yet, head over to railsinstall.org. There are instructions there, a downloader, and you'll be up and running in no time.
00:05:38.510
If, however, you're running OS X or Linux, I highly recommend going over to railstutorial.org and just going through the first chapter. It'll get everything installed for you, and you'll even get an application deployed on Heroku. Once you have Rails installed, if you run 'rails' from any directory that's not a Rails app, it's going to give you the syntax on how to create any Rails app with a bunch of different options— you can skip active record, specify what database you want to use, specify what JavaScript framework you want to use, couple runtime options, and finally, it'll give you an example of how to create the Rails app.
00:06:05.680
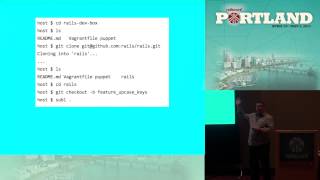
Let's go ahead and create our first Rails app by running 'rails new Twitter for Zombies.' When we run that command, it's going to create a bunch of files and directories for us. Some of these directories should look familiar from Rails for Zombies 1, like your controllers, models, and views directory.
00:06:26.280
At the end, it's going to run 'bundle install.' What 'bundle install' does is go out to the internet and download any external dependencies that your Rails application depends on. You don't need to worry about this too much; we’ll come back around and talk about Bundler later. So we've created our Rails app; now let's jump into the directory. We’re going to 'CD' into the directory, and if we run 'rails' from inside the directory, we're going to be given a list of commands that we can run on a Rails app.
00:06:49.560
This starts with the generate command, which generates new code, the console command which we’ll use to debug a little bit later, the server command to start our local development server, and the DB console command to jump into a console for our database. If we want more information about any of these commands, we can run them with the '-h' option. But first things first, let’s get our development server running, so we're going to run 'rails server.' That's going to give us some output and if we go to localhost:3000 in a browser, we're going to get the 'Welcome to Rails' screen.
00:07:15.300
We can also run 'rails server -h' for more options like running the server on a different port. The shortcut for this command, which we’ll probably run more often, is just 'rails s.' Next up, let's take a closer look at the 'rails generate' command. If we run it without any options, we're given a list of generators which we can use to generate some source for our Rails app. The shortcut for generate is 'rails g' and let's go ahead and use that to generate a scaffold.
00:07:36.470
A scaffold, if you're not familiar, is the basic building block for most of our Rails apps. We specify a resource, and it builds us a view to list out the items, edit the items, create new items, and delete the items. Here’s the syntax: we're going to go ahead and create 'rails g scaffold zombie' because we want to create zombies. We're going to give it a name which is a string, a bio which is a text type, and an age which is an integer.
00:08:05.700
When I say types, I'm referring to database types, and here's a list of all the other database types which we might find useful. When we generate a scaffold, it's going to create a bunch of files for us. Let’s take a look at a few: You can see here it’s generating a migration for us, the zombie model, it’s going to add resources 'zamba' to our routes.rb, it's going to create our zombies controller, and it’s also going to create our views which should look familiar from Rails for Zombies 1; you have our index view, edit, show, and new.
00:08:30.630
There are a couple other files that it's going to create, like helpers, tests, and assets, and we’ll see some of those later. But first, let's jump in and take a closer look at that migration. When we say migration, we're talking about our database migrations. This is how we make changes to our database from inside Rails. If you remember from Rails for Zombies 1, Rails is going to automatically create for us a primary key called ID; it doesn't even show that in the migration.
00:08:51.620
It's just assumed that every table is going to have a primary key of ID. The last thing you’ll see in this migration is this T.timestamps line. This T.timestamps line is the same as saying date/time created_at and date/time updated_at. These are magical fields in Rails—they get populated for you automatically, and you can use them in your views. When a model is created, the created_at gets set, and every time it’s updated, the updated gets set for you.
00:09:21.280
To give you a better idea of why migrations are so useful, here's a commercial I created back in my Rails Envy days. Hi, I'm Ruby on Rails. What you got there? Oh, these are a bunch of SQL files that all the developers on the team set out, and I’m really frustrated because they just keep overriding my database changes. It sucks.
00:09:52.460
Yeah, you feel my pain, right? Well, actually, Ruby on Rails uses something called migrations. This allows developers to make database changes independently without stepping on anybody's toes. You still have to write tons of SQL though, right? Well, no. Migrations actually use Ruby, so it’s database independent.
00:10:22.940
Wow, that sounds really good. I think I’ll give that a try! Actually, you know what, on my way home from work tonight, I’ll stop by Toys R Us and pick one of those up. While I’m there, I’ll get Barbie to give me a ride in her pink Cadillac all the way to your office in the land of make-believe where you can help us finish up my application and we’ll all live happily ever after.
00:10:49.440
So database migrations are how we version our database and keep track of changes, so we don’t have to send around SQL scripts and end up stepping on each other's toes. So back in our Rails app, we have this migration. If we start up the server at this point, uh-oh, we're going to get an error; it's not going to work. It gives us an error and shows us the line of code where there's an error. If we looked at that line of code, we would see zombies equal Zombie.all.
00:11:12.490
So it’s looking for the zombies table, but it's not yet in the database. Ah, we forgot to run that migration file! To run migration files, we run 'rake db:migrate.' Not only is that going to run our current migration, but if there are any other migrations that other people in our project committed, it’s also going to run all of those. Here’s the output we would see from our migration, and if we run our Rails server again now, if we go to '/zombies', we can get a list of the zombies and start creating them.
00:11:43.290
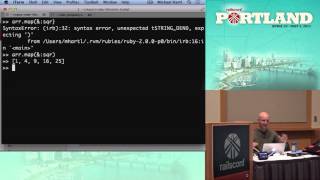
Now that we have a zombie table and a zombie model, let's jump into the console and play around with it. We use the console to debug our application so we can go in here and just start running Rails commands. Here, you can see I’m running Zombie.create with name 'Eric', alive, and age 27. That’s going to actually show us the SQL that’s going to be running inside of our Rails app, and it’s going to give us back the zombie object it created.
00:12:02.790
Now remember when you use tryruby.org, everything in Ruby has a return value— that's that hash rocket symbol you see right up there. You can see that this command returns an instance of the zombie. We can then run Zombie.first to get back the first zombie, which in this case is the zombie we just created. We can change the name of the zombie, and then finally, we can save the zombie, which is going to show us the SQL that it uses to do that, and it’s going to return true because it’s successfully saved the zombie.
00:12:25.740
Now you may have noticed that when we created this zombie, Eric here, we used a slightly different syntax. We actually used a different hash syntax. Remember, a hash is a collection of key-value pairs, and a key can be almost anything. A key can be a string. Here’s the old syntax with a hash rocket; the key can be a number; a key can more commonly be a symbol. You'll notice all of these different syntaxes I showed you here are compatible with both Ruby 1.8 and 1.9.
00:12:56.780
If we're using Ruby 1.9, this last hash can also be written as name:— it’s a little bit of a shorter syntax with two less characters. Throughout this entire tutorial, we're going to be using this new Ruby 1.9 syntax. If you're just getting into Rails now, you should be using Ruby 1.9— don’t even bother with 1.8; just use Ruby 1.9 and then you'll get access to this hash syntax you see here as well.
00:13:19.390
So here again is the code to create zombie Eric using the Ruby 1.9 syntax, and here it is using the Ruby 1.8 syntax. But really, it’s not Ruby 1.8 syntax; you can still use the same syntax. This is sort of old hash syntax in either Ruby 1.8 or 1.9. It's up to you which one you like better; you can use either. But in this tutorial, like I said, we’re going to use the new way.
00:13:40.350
If you take a look inside the controller that the scaffolding created for us, you can see that in the respond_to block over here, it says render :json, @zombies. That's using the Ruby 1.9 syntax, and it does the same thing as the old syntax. We have our zombie table, but we want to make some changes to the database. How do we do that? Well, we do that by generating a migration.
00:14:00.130
We're going to call our migration 'add_email_and_rotting_to_zombies.' We're going to specify the columns we want to add: in this case, the email column, which is a string, and rotting, which is a boolean. When we want to add a migration that adds columns, we can use this title format, and it'll write all the code for us. So we say 'add anything to' and then the table name. We have our column names and types, and that's going to generate a migration for us that looks a little bit like this.
00:14:25.490
As you can see here, it’s adding two columns to our zombies table: an email column and a rotting column. But what happens when we want to add some table options—some column options for a default? We can just write 'default: false.' A couple of other migration options here, besides default, are: we can also add a limit, specify whether it can’t be null, specify position in the table to put the column, as well as add a unique constraint to ensure that this column is always unique at the database level.
00:14:56.000
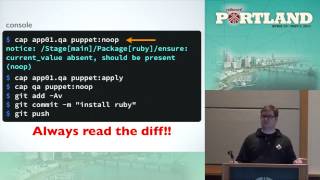
Now that we have a migration, we need to run 'rake db:migrate' to add those columns to our database. 'Rake db:migrate' is not only going to run our new migration, but if I checked out somebody else's migrations, it's going to run those too. Some other rake commands you need to be familiar with start with 'rake db:rollback.' What 'rake db:rollback' is going to do is look at our most recent migration and undo it at the database level. It’s going to roll it back.
00:15:13.390
This can be really useful if, let’s say, I haven't committed my migration yet and I want to make some changes and then migrate again. It's also really useful when you think about deployment. If I deploy my application, run the migration, and, oops, I didn’t want to run that—something went wrong—I can quickly type 'rake db:rollback.' That will roll back the migration, and I can make any changes that I need to from there.
00:15:35.860
Another useful rake command is 'rake db:schema:dump.' This gets run automatically every time we run 'rake db:migrate.' See, after you have a Rails app that’s lived for three or four years, you can end up with a lot of migrations. I mean, over a hundred migrations, and it's unrealistic for a new developer to have to run all those migrations. What you find is that migrations start to get brittle after a while. This is why we have a schema.rb.
00:16:04.900
It looks something like this: as you can see here, it has our entire database structure. So the next time you check out somebody's Rails app and you need to get up and running and create the database, what you're going to run is 'rake db:setup.' That’s going to create the database if it doesn’t exist yet, run the schema, and create the database using that schema file, and then it’s going to run any seed data you need in there.
00:16:24.680
So we know how to add columns to our database, but how do we remove them? Well, let’s go ahead and generate another migration for that. We’ll call it 'remove_age_from_zombies.' The column we want to remove is the age column, which is an integer, and we are using another pattern here with the migration name 'remove something from table name.' That’s going to generate a migration for us. It’s obviously going to have the 'remove column' command, but if you look at that 'remove column' command, you’ll notice it doesn’t have enough information in it to roll it back.
00:16:50.810
Sure, we can remove the column, but when we want to add it back, what type was it? So in this case, we also need to have an 'add column' command in here. Now, remember, in the previous migrations, we had a change method. Instead of a change method, we're going to have an up method to migrate up and a down method so that our application knows what to do if we need to roll this migration back.
00:17:12.240
A couple of the migration commands include 'rename column', 'rename table', 'drop table', 'change column,' and 'change column default.' So we know how to add columns, we know how to remove columns, but what about everything else? Well, for everything else, we're simply going to create a migration and name it anything we want. So in this case, let's drop the zombies table altogether.
00:17:42.400
That's going to generate a up-and-down method for us, and we’re going to have to write it. You can see here I’ve written it for us; we have a drop table in the up and we have a create table in the down. For more information on database migrations, head over to guides.rubyonrails.org— there’s a Rails database migrations guide which has tons of great information about migrations.
00:18:01.720
So when we created our Rails app, it ran 'bundle install' and installed external dependencies. How do we know which dependencies to install? Well, that came from the Gemfile which is at the root of our directory. Here you can see a listing of all of our Rails app's external dependencies, and whenever we want to make sure we have these installed or go out and install new ones, we can just run 'bundle install.'
00:18:25.720
And remember I got called by default when we created our first Rails app. For more information on Bundler, obviously, I don’t have time to go into all the nitty-gritty. Head over to rubyonrails.org in the screencast section; there you’ll find a screencast on bundler I created. Also, you can go straight over to the bundler website at gem bundler.com.
00:18:52.280
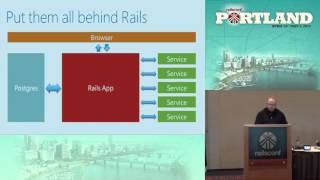
By default, our Rails application uses a SQLite database. One way we can tell this is on the previous slide where we saw our gem dependencies; it had listed 'gem sqlite3' so it's using a SQLite database. But how is our database configured? Well, that happens in our config database.yml. Let’s take a look inside.
00:19:11.350
Here you can see we have a configuration for our development, test, and production environments. How might we change this out for MySQL? We simply would have to change this configuration, giving it the MySQL adapter, the database name, the username, and password for our database, and we would replace the SQLite driver with MySQL inside of our Gemfile, run 'bundle install,' and then we’d be using MySQL.
00:19:46.740
That’s all we're covering for level one. Now it's your turn to take this information and learn by doing in the challenges.