00:00:15.920
My name is Tony, and you are at the Anatomy of a Ruby Gem: Going from Zero to Sharing Code. Oops, that just went away! Great!
00:00:23.130
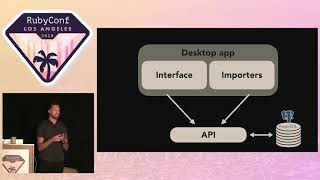
So, I have about ten years of professional Ruby development experience. I've authored a few gems, and to my horror, I found out that some of them are actually being used by real businesses. I work for a company called Springbuk in Indiana, where we perform healthcare analytics for insurance brokers, covering about a million lives worth of data—or at least that's what the marketing department told me.
00:01:01.920
Today, we're going to talk about three primary points: What is a Ruby gem? Where do gems live on your system? And how are they made and published to rubygems.org? A couple of quick housekeeping notes: This talk is primarily geared towards junior developers, so it's going to be somewhat high level. There will be some hand-waving, and while we'll dig into little bits of detail, the focus will mostly be on the general idea of how gems are constructed. We will only cover pure Ruby gems—no C extensions, and nothing about JRuby—just plain old Ruby gems.
00:01:37.700
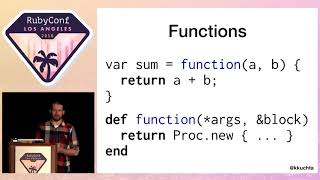
A quick note: whenever you see the dollar sign, it indicates a terminal window, and double arrows are akin to IRB. The reason I primarily wanted to do this talk is that I noticed something from the various teams I've worked with over the years. Some of my supervisors see me work, and they think I'm magical. My co-workers think I'm pretty much Neo. Because of these perceptions, I started to get a big head and thought I was a superhero. But at the end of the day, this is all I'm really doing: just running 'require' like everyone else.
00:02:16.430
So let's start with what we know: we know how to install gems; we know how to use them. You can install a gem with 'gem install'. We'll use Awesome Print as an example. Voodoo happens, the gem is installed. You hop into IRB, require the gem, and suddenly the gem is loaded, and you can do whatever you want with it. Alternatively, you can have a Gemfile, pop in 'gem' and the name of the gem you want, run 'bundle install', and the gem magically installs. Running 'bundle exec' against your app will make Awesome Print available right away.
00:02:55.350
However, when you run 'gem install awesome_print', it doesn't really tell you much about what exactly is happening. Fortunately, 'gem install' has a nice verbose flag, so let's just run this and see what happens. Oh boy, that's quite a bit of stuff! If you're in the back, I don't expect you to read this, but if you can read that, please tell me the name of your eye doctor because that'd be very impressive. So let's break this down a little bit.
00:03:37.700
Here's the exact same command with a lot of the extra stuff stripped away. I'm using the shortcut path to Ruby that points to the actual installation of my locally installed Ruby here, just to keep the lines down. If you look up at the very top, you'll see that we're making a normal web GET request to rubygems.org, pulling down a file called awesome_print gem with a version number attached. We start listing the files, and at the very top, you notice you have a license, a README, and then you just see some regular Ruby files. Further down, you even start seeing some spec files, and then it tells you the installation is done, and you have the gem installed.
00:04:08.970
So these are just Ruby files. To spoil it for everyone, there's not really much magic here: gems are just plain Ruby files. They are read like Ruby files, executed like Ruby files, and they're downloaded as what's called a gem file, which I'm sorry to say is just a zip file renamed specifically to a gzip file. So you're dealing with a zip file full of files, and that's pretty much the entirety of a gem. Yes, there are sometimes some C extensions, but we won't worry about that right now.
00:04:41.040
So that's how gems get there. If you notice in the previous verbose command, you saw where all these files are being installed. In this case, I'm using RVM for my locally installed gems and my homebrew versions, and then the version of Ruby where the gem is installed. You'll see a 'lib' directory, a Ruby directory, a gems directory, and the version of Ruby that is installed. In summary, all of these listed directories are the default locations where gems live on any system as far as where they reside by default.
00:05:36.300
As per the Ruby gem installation, notice that Ruby will store each gem, as well as each individual version, in its own separate directory organized by a dash in the actual version number. This allows Ruby to know which specific versions of gems to load. Now that we know how they're installed and where they live, let's discuss how you tell Ruby to actually load them up.
00:06:17.710
There are two ways to do this: you can start up IRB, or you can use the Ruby second package method with a simple 'require'. Then, you require the gem that you want, and you have it available right there. In this case, I'm loading up the i18n gem. Unless you tell it otherwise, you will always get the latest version installed on your system. In this case, this is 1.1.0.
00:06:42.370
Technically, you do not need to require RubyGems anymore since version 1.9; this is mostly just for historical purposes. If you go online, you may see a couple of older example scripts manually requiring Ruby and RubyGems. This is no longer necessary. Alternatively, if you need to actually load a specific version of a gem, there is a gem method that comes with RubyGems.
00:07:24.360
You might notice this looks the same as syntax in a Gemfile. That's because the Gemfile is essentially a glorified Ruby file that is read as Ruby. You can specify a gem to use and the actual version to run against. This process is called activating a gem. So if you ever run 'bundle exec' on a rake command and it complains about certain gems being activated before anything else, this is Bundler telling you it was instructed to load a specific gem, but something else further up the chain is already activated.
00:07:49.870
Quick note: never actually run the gem method; that's what Bundler is for. But it's just there if you ever need to execute a one-off script and want a very specific version of the gem. In this case, I'm explicitly loading up the i18n gem version 0.93. Now that we've gone through how gems are loaded up, along with how they're installed and where they live, the next question is: what exactly makes a gem? That's the whole point of this talk.
00:09:03.530
A gem can best be described as comprising four parts: a gemspec file, a tweak to the load path, the activation—which is handled by RubyGems and Bundler—and somewhere along the line, a well-placed require to actually start using the gem. The gemspec file is the primary focus of the gem; it describes the gem to RubyGems.org and to the actual Ruby process. It contains a name, description, version number, and lists dependencies—what things need to be loaded before this gem can be used.
00:09:58.470
Similar to Rails, RubyGems has a very strong convention: the gemspec file is typically named the same as your gem, 'gem.spec'. However, a gemspec file is, at its core, just Ruby code, nothing particularly interesting about it other than it issues certain methods in a specific way to describe the gem to the system. Here is a default gemspec that you can generate.
00:10:52.410
This is pretty much all you need to get a gem set up and running. As we dive in, let's start with an anti-pattern. There needs to be a way to tell the gemspec to tell RubyGems what version of the gem it is. You may notice while working with various gems over the years that you have a constant named after the gem followed by a version constant. Within that, it will return the version.
00:11:36.849
This is how other gem authors and developers can ask the gem, 'What version are you on?' If I know I need to do something different between different versions, I can do so here. However, as developers, we don't want to repeat ourselves, so why should we write out the version and then write out the version inside a Ruby constant for developers to use? Let's use both at the same time! But to do this, we need to tell Ruby how to actually load the file that has the version number in it.
00:12:17.989
To do that, you have to tweak the load path. The dollar sign load path is a global in Ruby that lists out an array of every directory the current running Ruby process knows about. So when you run 'require' and point to a file, it will look through all those directories and try to find a matching file. The first one found is used, and if it can't find it, that's when you get the 'I don't know what this file is' type of error. Because Ruby doesn't fully know about the gem yet, you have to tweak the load path to explicitly require the version file.
00:13:01.360
The load path is boilerplate code, so don't ever touch it unless you know what you're doing—it could disrupt your system. Further down, we invoke the gem specification object. This is part of Ruby Gem's package and is the thing that explains what the gem is to the system. It is a series of methods that you call and configure. Bundler has a lot of documentation about what each of these methods does. The top of the gem specification commonly has the name of the gem, the author’s information, a description, a licensed home page—which is typically linked to the GitHub repo—and other basic meta-information for humans.
00:13:49.900
The top of the gemspec is for humans to understand, while at the bottom, the gemspec describes the gem to the computers, or specifically to the Ruby process. The 'files' method instructs RubyGems about all the files that actually comprise this gem. You may have noticed in the example with Awesome Print that we're pulling down a readme file, all the spec files, and numerous plain text files. Nowadays, when gems are packaged, they typically don't include these files.
00:14:30.130
This pattern is typically used when you assume you're on a Unix-like system. It will shell out to 'git' with a few magical flags and just extract all the normal Ruby files that the gem actually uses while ignoring the readme and test files. The 'bin' directory is where the executable scripts go, like the rake command, the rails command, and the bundler command for the bundled gem. These are appended to the operating system path, so when the gem is loaded, all the gems are activated, allowing you to hop into a terminal and execute them.
00:15:20.950
This is a list of the actual executable files, with the executable method require paths. This is commonly never touched, but it lists out the directories that RubyGems will expose inside of the gem. Commonly, everything is included in 'lib'. That's a convention nowadays, and I believe it will use 'lib' by default if you don't specify any directories.
00:15:51.850
Finally, we have dependencies, which are crucial. In a gemspec, there are two types of dependencies: runtime and development. The runtime dependencies are gems that must be installed and activated before the gem is functional. In the example given, we need the Postgres gem, at least version 0.19, for this gem to work correctly. If we're just working on the gem locally, we also have development dependencies; for instance, we want rake version 10.2.
00:16:51.640
As we describe the gem, we have the gemspec, the load path, and what's called an entry file, which is what makes a gem. An entry file is typically a Ruby file named the same as your gem, located inside the 'lib' directory that the gemspec specifies. In this case, you might have a 'my_gem.gemspec'. Then, within 'lib', we commonly have 'my_gem.rb'. This is the file that is executed when the gem is requested in the system.
00:17:54.940
Inside 'lib', you might have a variety of extra subdirectories to hold various support files. You would typically have a default version file, which has the version constant within its namespace that lists out the current version of the gem. This is the file that is included in the gem spec to ensure you only need to manage the version number in one location.
00:18:58.810
So let's try to build a gem quickly. By 'try', I mean I have slides with pre-made code because we're not doing live coding today. We'll create a gem called RB 21, which is a simple implementation of the game of 21, also known as blackjack. We're not going to implement too much of the game right now—just the foundation for it so that a full game can be developed later. We’ll create a card class with a value and suit, a deck class to shuffle and deal cards, keep track of discarded cards, and a hand class that will assess if we have a blackjack, if we've busted, or what the current value of our hand is.
00:20:04.520
This is a very simple structure that we’ll implement for the example, using Ruby 2.5.1 and the latest version of Bundler at the time, 1.16.5. I'm especially calling out Bundler because it will automate much of the initial setup for us. In the past, developers would need to remember how to create the gemspec file, understand what methods are necessary, and know where to create the directories.
00:20:51.470
You no longer need to worry about that if you're using Bundler. You can have Bundler scaffold a blank gem for you. As versions of Bundler release, some of these default files may tweak slightly. One day, I hope they get rid of the load path hack and the gemspec boilerplate, but today is not that day. I believe Bundler 1.17 is out, but the core structure remains almost identical across versions.
00:21:54.570
In my terminal window, I'll execute 'bundle gem' followed by the name of the gem. The first time you build a gem on your system, it may ask a series of questions that it remembers for next time. First, it will ask if you want to create tests for your gem, and the answer is always 'yes.' You want tests for your gem! It will then inquire whether you want to use No Tests (and we’re not going to select that). You will then have options like RSpec or MiniTest to bootstrap your testing framework.
00:22:43.340
So we confirm that we want RSpec. Next, we get asked if we want a license for the gem, which you typically answer 'yes' to. Bundler will give you a copy of the MIT license and pre-populate the license value in the gemspec. Once that's done, it may also ask if you want to set up a Git repository, to which you also answer 'yes'. Bundler initializes a git repo for you, but it won't point it to anything, so be sure to set that up with the correct remote—whether it’s GitHub, Bitbucket, or GitLab.
00:23:28.920
After answering those questions, you'll see that a directory was generated for your new gem. Inside that directory, you will find a gemspec for your gem, along with the entry file, a version file, and other necessary files to help build the gem. Bundler will also create a '.gitignore' file by default, will include RSpec’s default spec file, and may create a Travis CI configuration file if you desire continuous integration.
00:24:10.130
We have a fantastic rake file with pre-existing tasks that help with gem management. We can build the gem file, which is essentially just a gzip file, and can locally install it for testing and manipulation. Additionally, we can publish the gem to rubygems.org, which will automatically make a Git tag for us, push this to our Git repository, and upload the gem to the RubyGems server for everyone to use.
00:25:11.740
Now, the first time you actually attempt to release a gem, it might tell you that RubyGems needs to know who you are. You can set up an account quickly through the RubyGems site by providing email and password credentials, which will be encrypted locally. This allows you to access all the gems you have published, helping you keep track of them. You can also flag multiple contributors on a gem, allowing commits from different developers under a shared gem.
00:26:03.870
So you need to let rubygems.org know who you are. Run 'gem push' to set your credentials. Assuming your account is already set up, you will run 'gem push', which will prompt for your email and password, storing it locally so you won't need to input it every time. However, if you encountered a problem, this may feel awkward, as the command initially instructed you to run 'gem push' before you even specified what gem you're pushing. This is because Bundler and RubyGems operate as separate projects.
00:27:17.960
Next, the command will help you set your credentials, and then you try to push again. If the release process fails the first time, it may complain that there's already a tag created for the version you are trying to release. However, it will negate the previous error and confirm that your gem has been successfully published to rubygems.org. Once published, anyone can see your gem available for download, with all its metadata, human-readable descriptions, and any dependencies specified in your gemspec.
00:28:43.090
You may also specify a required Ruby version in the gemspec, as this helps clarify compatibility. For instance, you could specify that your gem is only workable on Ruby 2.5 and later. And that’s more or less it! Essentially, a gem is just Ruby code structured in a specific way. The most complex aspect is the gemspec, which defines the gem's dependencies, load paths, and overall organization.
00:29:05.390
Bundler and RubyGems take care of most of the heavy lifting nowadays. Looking back to the days of Ruby 1.8, gems weren't even a concept, and seeing the advances we've made with Bundler makes it much easier to scaffold and manage your gems without digging through extensive documentation.
00:29:20.740
These slides are available at the top of the GitHub repository if you wish to experiment with the gem structure I created, known as RB 21. The purpose of this example gem is to allow junior developers an opportunity to experiment with gem development without fear of impacting production gems. It's a safe project for practicing gem contributions.
00:30:00.220
Now that you know how to create a gem, you can impress your co-workers and pretend you’re a magician. Thank you!