00:00:12.240
Hi everyone! I got a response. Hi!
00:00:19.000
This is awesome! Okay, thanks for having me here. I'm going to get started.
00:00:26.000
Today, I'm talking about implementing a visual CSS testing framework. We're going to be using automatic screenshot comparison to catch style regressions.
00:00:32.160
My name is Jessica. Just to introduce myself, I'm jessicart on most of the internet. I work at a company called Bugsnag based in San Francisco.
00:00:37.480
Bugsnag is an exception monitoring tool, and I'm a software engineer there, primarily working in Ruby and JavaScript. Our stack includes many languages, and we also provide error notifiers for various languages and frameworks.
00:00:48.360
We support things like .NET, Objective-C, and Angular, enabling people to monitor their errors and crashes from all their different applications all in the same place. We are currently hiring, so please get in touch with me either here or at our booth at RailsConf.
00:01:07.439
If you're interested in working with developer tools at a small company, we have mugs and stickers at the booth, so feel free to grab those!
00:01:18.200
I also wanted to let you know that I have a written version of this talk available, as I might talk fast or some of the slides might go by quickly. If you're interested, you can find it on the Bugsnag blog.
00:01:29.600
Now, back to implementing a visual CSS testing framework. What am I even talking about? Writing, reading, and reviewing CSS can be pretty intense. Refactoring, especially, can be quite a challenge.
00:01:48.320
Generally, this is what my face looks like when I'm working with CSS.
00:01:53.759
At Bugsnag, we decided to tackle a huge multi-week project that involved an entire organizational and code refactor. We wanted a way to test that our site looked the same despite making significant code changes.
00:02:07.759
Unfortunately, that didn't always work out for us.
00:02:13.160
We went through many iterations of refactoring and realized we needed a tool to help us test the pages automatically. Otherwise, our testing process would look something like, 'Did you visit all the pages? Have you clicked on that? What about that border?'
00:02:25.080
This method was wasting a lot of developer time, so we needed a better solution.
00:02:31.040
We started hunting for a way to test our CSS. We wanted to know if there was a tool already built that could do what we desired, but we weren't exactly sure what we wanted yet.
00:02:42.280
After some digging online, we found several libraries that performed similar functions. It took quite a bit of effort to compile a comprehensive list.
00:02:54.400
From the list we found, we decided to try a few and see what happened. One of the first frameworks we stumbled upon was Facebook's open-source library, Huxley.
00:03:07.599
Huxley's README states that it takes screenshots while you browse and notifies you when they change. That sounded amazing and seemed like something we might be looking for.
00:03:19.640
However, I noticed that it hadn't been updated in over a year, which wasn't promising. I thought maybe it was completely done, and there were no bugs in it.
00:03:31.799
After spending a solid day fiddling around with it, I found it did work sometimes, but it was a bit too buggy for our needs. We didn't want to deal with additional bugs when we were trying to find existing ones.
00:03:47.400
It would have random failures and sometimes wouldn't take screenshots. So, we realized this wasn't the tool we were looking for and moved on.
00:04:02.360
Next, we tried a different library called Kiot. This tool allowed you to make assertions about your page's elements and how they were styled in the browser.
00:04:14.360
It sounded interesting, but upon checking the example code, I quickly decided I didn't want to use a library that required manually checking pixel distances, like whether an element was 10 pixels away.
00:04:28.919
Designs iterate quickly, and we don't want to be manually checking all those different heights. I was looking for a smarter framework, so this one didn't work.
00:04:42.240
We tried a few more libraries, but the same failures occurred. We were still unable to find what we wanted.
00:04:54.560
As I mentioned, there are a lot of frameworks out there, so before you rush home to write your own, check out existing ones to see if they meet your needs.
00:05:05.800
But I decided I needed to clarify what I really wanted. I started thinking about what would best fit how Bugsnag is built.
00:05:17.360
I wanted a visual tool to take screenshots rather than manually measure everything. We wanted a way to compare our production site with our local development.
00:05:30.800
For instance, let's say we have a feature branch that we just committed to; we would want to compare how our homepage looks on that branch versus how it looks in production.
00:05:50.759
In that context, we wanted to highlight any differences automatically in a way that was easy to visualize.
00:06:09.319
At Bugsnag, our web dashboard is built with Rails. This, combined with the fact that I wanted to take screenshots for testing, influenced my decision to write my own framework.
00:06:22.479
Many existing CSS testing frameworks are based on JavaScript, but I wanted to leverage our Rails environment.
00:06:40.760
At Bugsnag, we use Git for source control in a feature branch workflow. This means we have a master branch that is always deployable and stable.
00:06:58.639
When we create a feature, we branch off of master until the feature is complete, at which point we merge it back.
00:07:15.479
Considering the tools available to us and examining some of the screenshot libraries, I realized there wasn't actually that much code to them.
00:07:27.520
So, I decided to write my own framework. However, just as a disclaimer, this talk is not about promoting a gem; it's about walking you through my process.
00:07:41.240
In fact, this isn't a gem or open source; I do have a blog post available if you're interested in the code.
00:07:49.600
First, I needed to develop a process for how I wanted my tests to work. I required a way to automatically visit the pages of our site through an actual browser.
00:08:09.600
Once the test visited the page, I wanted it to take a screenshot of the entire page, not just the current viewport.
00:08:27.800
This was important in case changes occurred below the footer; we needed to capture those areas as well.
00:08:46.480
Next, I had to establish a storage method for the screenshots. I needed a way to upload and download these screenshots from that storage.
00:08:59.200
Using Git, I planned to upload a screenshot every time I pushed to a branch.
00:09:05.800
My feature branch screenshots would need to upload to a storage area and allow me to download the already uploaded master screenshots.
00:09:30.480
After uploading my screenshots, I needed a way to create diffs between them.
00:09:47.680
This involved comparing the latest screenshot from my feature branch with the one downloaded from the master branch, and marking the visual differences.
00:10:08.440
Finally, I wanted to display these diffs in an accessible way so everyone on the project could view the differences depending on the commit.
00:10:27.680
Now that I had a plan, I could start building our framework based on these requirements.
00:10:44.600
First, we needed to write tests that run automatically after each push, so we decided to use RSpec.
00:10:55.440
RSpec is a testing tool for Ruby, and we already use it for our tests in the Rails app.
00:11:09.840
We aimed for our specs to look simple, where we could navigate to a local URL and save a screenshot of that page.
00:11:22.160
We didn't want to have complex assertions that could fail, except if the tests failed due to a technical issue.
00:11:39.160
Furthermore, we needed to keep these tests separate from our main tests, so we marked them with the visual tag in RSpec.
00:11:55.520
This way, our visual specs wouldn't run with our main specs unless we specifically wanted them to.
00:12:12.400
Separating these specs also helped with local build speed since we didn't want our tests bogged down by waiting for visual specs to complete.
00:12:27.200
This approach allowed us to iterate on our main specs quickly and push more often.
00:12:40.960
In Continuous Integration (CI), we wanted our main specs to be fast, enabling us to merge non-visual pull requests without waiting.
00:12:54.720
At Bugsnag, we use Buildkite for our CI, which allows us to add steps to our tests, separating our main specs from the visual ones.
00:13:09.600
Next, we needed a way to visit web pages and take screenshots with our RSpec tests, for which we decided to use Selenium.
00:13:21.440
Selenium is a tool for automating browsers for testing purposes, and we specifically needed to use their web driver API.
00:13:38.560
This API allows us to drive a browser natively on local or remote machines. We needed access to an actual browser since CI doesn’t come with built-in browsers.
00:13:55.920
To achieve this, we decided to use a service like BrowserStack. Before running our visual tests, we needed to start up our proxy to BrowserStack alongside a forked Rails server.
00:14:14.240
After that, we would create an instance of our Selenium web driver and, following our tests, terminate these services.
00:14:29.440
We also enabled WebMock in our visual tests to prevent outside web requests during tests, ensuring we could run real requests with our local server.
00:14:41.520
To set up our Selenium web driver, we passed it the desired capabilities like the browser name and version we wanted.
00:14:57.440
Unfortunately, I found out that the capability of taking full-page screenshots only worked with Firefox, which limited our options.
00:15:14.920
While we couldn't use this tool as a browser compatibility tool, it worked well for our current needs.
00:15:29.600
After setting up our Selenium driver and Rails server, we could then save our screenshots in our tests by navigating to our localhost URL.
00:15:44.480
We established a local screenshot directory for a clean area to store all the screenshots temporarily.
00:15:58.080
Once this was set up, we utilized our driver to save screenshots to the designated path with an appropriate naming convention.
00:16:10.360
When we wrote tests for static pages like our homepage, we anticipated issues with dynamic data producing false positives in diffs.
00:16:27.600
To mitigate this, we set up fixture data for our RSpec tests and adjusted any other data not covered by those fixtures using Selenium's JavaScript support.
00:16:40.440
Now that we could take screenshots, it was time to figure out how to create a diff between two screenshots.
00:16:53.760
ImageMagick was perfect for this, despite its somewhat outdated website.
00:17:07.680
ImageMagick is a tool used for converting, editing, and composing images, primarily through its command-line tools.
00:17:23.760
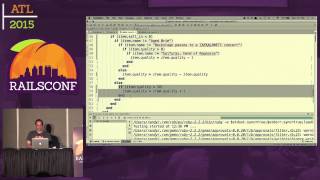
One of these tools is 'compare,' which, with the necessary options, allows us to shell out and produce diff screenshots based on two other images.
00:17:39.320
For example, if we made a simple change like altering the header, ImageMagick would be able to spot those differences and provide a visual diff.
00:17:55.040
There are several options we can utilize with ImageMagick's compare tool, which I will explain next.
00:18:09.760
The compare tool will visually annotate differences between an image and its reconstruction, essentially producing a diff for us.
00:18:25.040
The compare tool can output a metric that gives us a measure of the differences according to a specified metric.
00:18:39.760
For instance, we used 'PAE,' which stands for Peak Absolute Error, to identify how much of a fuzz factor was necessary to make all the pixels similar.
00:18:55.440
This fuzz factor helps in cases where we want to ignore minor changes, such as when gradients render slightly differently in different browsers.
00:19:12.640
Right now, we don't utilize this output, but it could be valuable if we wanted to make our assertions fail meaningfully.
00:19:24.800
However, we don't strictly require failures upon detecting a diff, as it doesn't necessarily indicate an issue.
00:19:42.400
While working on the specs, I noticed some occasions where the diffs were not produced. This happened due to screenshots having different heights unexpectedly.
00:20:04.160
For instance, if we accidentally removed a footer, ImageMagick wouldn't allow for a default comparison, so we utilized sub-image searching.
00:20:20.480
Sub-image searching makes ImageMagick search for the best location of a small image within a larger image.
00:20:36.560
This process can be slow, but it typically doesn’t happen often in our tests since we don’t usually modify layouts that drastically.
00:20:54.720
Another issue we encountered was when screenshots were completely different, leading to ImageMagick not providing a diff.
00:21:07.960
To address this, we found the 'dissimilarity threshold' option that allows us to determine how different two images can be to produce a diff.
00:21:19.680
The threshold initially defaults to 20%, but we changed it to 1% to allow significant differences, especially when testing.
00:21:34.800
This change, however, may slow down tests considerably, so we used it only when necessary.
00:21:47.120
The last arguments to ImageMagick are simply the paths to the current screenshot, master image, and where we want to save the diff.
00:22:05.520
Now that we have our screenshots and diffs, we needed a place to store them online so we could retrieve them in our Rails app.
00:22:20.760
We decided to use Amazon Web Services (AWS) for cloud storage, leveraging their Ruby API.
00:22:39.360
We created a bucket called 'BugsnagShots' where we would host our screenshots.
00:22:56.720
Within our specs, we called 'save_shot,' which managed our screenshots directory, taking snapshots and uploading them to AWS.
00:23:12.560
The 'save_shot' method was responsible for getting the current screenshot, master screenshot, and diff screenshot to AWS.
00:23:30.640
We would first find the correct area within our AWS bucket and upload the current screenshot.
00:23:50.480
Next, we would download the master screenshot needed to produce the diff.
00:24:06.760
After verifying we had the master screenshot, we would execute our ImageMagick comparison to generate the diff image.
00:24:28.880
Once that was complete, we would upload both the master screenshot and the newly generated diff to our AWS bucket.
00:24:44.880
We used a naming pattern incorporating the commit SHA, area of the site, page name, and image type for files in AWS.
00:25:00.400
An example could be a commit SHA of 'A1A1A1', indicating the marketing section of our site on the index page, uploading the diff for that page.
00:25:15.360
The image types could include the current screenshot, master screenshot, and possibly the diff.
00:25:30.480
Now that we had our images on AWS, we needed to view them, but accessing screenshots from a bucket directly was far from ideal.
00:25:43.440
We didn't want the entire team fiddling with the bucket, so we set up a custom viewing page in our admin dashboard.
00:25:57.440
We created a page that provided a list of current branches, along with their last three commits.
00:26:12.760
The controller action retrieves our remote branches and verifies they're available in AWS, then formats the branch names for the view.
00:26:28.200
We loop through the branches and offer a way to prune remote branches for cleanliness.
00:26:45.120
When you click into a specific area, you can view all screenshots and diffs corresponding to that section.
00:27:02.480
The controller action fetching images for our view grabs these from our AWS bucket, allowing easy visualization.
00:27:21.120
At this point, we've completed our tool, but I think improvements can still be made.
00:27:40.480
Currently, tests pass regardless of whether there is a diff, only failing for execution issues.
00:27:50.680
It might be worth considering if a diff should trigger a failure in the future, but this needs careful consideration.
00:28:05.000
We should also consider if we should avoid uploading diff images entirely when there is no visual change.
00:28:18.440
This could save space on AWS and reduce clutter on our admin dashboard.
00:28:34.960
We might even explore automatically linking these diffs to relevant GitHub PRs, but this could create excessive notifications.
00:28:50.920
Currently, we only diff between the latest commit on a branch and the most recent commit on master.
00:29:05.680
It could be useful to differentiate between the most recent and the previous commits on the same feature branch.
00:29:22.400
This would help in identifying changes pushed directly to master as well.
00:29:37.680
Additionally, I'd love to connect our tool to more browsers to establish it as a backward compatibility test.
00:29:55.440
Anyway, that's all I have! Feel free to find me online or during the conference to discuss this further or just say hi.
00:30:06.640
I also wanted to mention that I’m working on a book with Just Enough Media about a command-line tutorial series I wrote a while ago.
00:30:22.720
It's in its early stages, so feel free to visit that page for updates. Thanks for having me!
00:30:41.840
Do any of you have any questions?
00:30:52.760
So the first question was whether I’m telling the tool which pages to visit or if it traverses the site automatically.
00:31:04.320
Right now, I specify which pages to visit but we use Selenium to click around to check different states.
00:31:18.760
So, currently, there’s no automatic traversal, but that could be something to implement.
00:31:32.440
The next question was whether we’re capturing any metrics from ImageMagick.
00:31:51.160
While it provides some metrics, we aren’t capturing them yet, but it would be easy to implement that.
00:32:03.280
Finally, there was a question about committing images to check diffs in Git.
00:32:14.960
Up until recently, Git was not recommended for images due to repo size increase issues.
00:32:33.000
However, GitHub's new Git LFS addresses those problems, which we need to explore.
00:32:47.760
Thank you!